1. Bước 1: Đăng ký tài khoản Dev và tạo App trên facebook:
1.1. Vào website https://developers.facebook.com đăng ký tài khoản
1.2. Xong vào mục Create App tạo 1 app (thường tôi chọn danh mục NONE), xong bấm Continue
1.3. Đặt tên cho App, xong bấm Create App:
1.4. Tiếp theo vào Setting/Basic (menu ở bên trái), điền URL vào mục Privacy Policy URL và Terms of Service URL. (Điền đại website nào cũng được). Sau đó bấm Lưu (Save Changes ) ở góc dưới bên phải.
1.5. Tiếp theo bấm vào nút "In Development" để chuyển qua chế độ Live. Thông báo hiện ra thì bấm "Switch Mode".
1.7. Trong Select Android Store chọn Google Play.
1.9. Tiếp theo trong trang
Quick Start, kéo xuống và điền thông tin Package:
1.10. Để lấy thông tin Package Name, ta vào trong code của project và tìm đến file AndroidManifest.xml: android/app/src/main/AndroidManifest.xml sẽ thấy ngay Package Name . Còn Default Activity Class Name chỉ cần thêm đuôi .MainActivity là được.
1.11. Tiếp theo, bấm Next thì sẽ thấy yêu cầu về Key Hashes, chỉ cần vào Terminal chạy dòng lệnh như hướng dẫn chỗ mũi tên màu đỏ là ra Key, xong copy dán vào ô Key Hashes rồi bấm Next. Vậy là xong.
2. Bước 2: Chỉnh sửa code React Native:
- Mở source code. Tôi dùng VS CODE.2.1. Android:
- Mở file "build.gradle" trong thư mục android và thêm vào dòng mavenCentral() ở vị trí như hình:
- Tiếp theo, mở file "build.gradle" trong thư mục android/app và thêm dòng khai báo này vào vị trí như hình dưới:
implementation 'com.facebook.android:facebook-android-sdk:[5,6)' //for fbsdk
- Tiếp theo, mở file android/app/src/main/res/values/strings.xml và chèn thêm dòng khai báo dưới đây, nhớ thay APP-ID bằng của bạn:
<string name="facebook_app_id">APP-ID</string>
- Tiếp theo, mở file android/app/src/main/AndroidManifest.xml và chèn 2 dòng khai báo này vào như hình:
<uses-permission android:name="android.permission.INTERNET" />
<meta-data android:name="com.facebook.sdk.ApplicationId" android:value="@string/facebook_app_id"/> <!-- fbsdk -->
Vậy là xong cho Android. Tiếp theo làm iOs.
2.2. iOs:
- Mở project ios trong Xcode.
- Kích chuột phải vào Project và chọn NewFile như hình:
- Kích chuột phải vào file Info.plist chọn Open As ▸ Source Code.
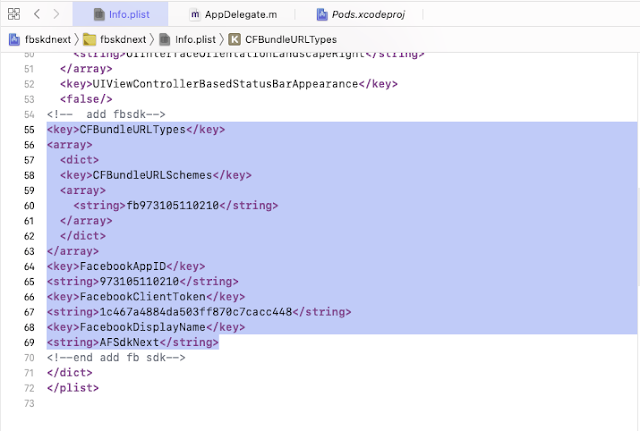
- Thêm đoạn code dưới đây vào ngay phía trên thẻ </dict>
<key>CFBundleURLTypes</key>
<array>
  <dict>
  <key>CFBundleURLSchemes</key>
  <array>
    <string>fbAPP-ID</string>
  </array>
  </dict>
</array>
<key>FacebookAppID</key>
<string>APP-ID</string>
<key>FacebookClientToken</key>
<string>CLIENT-TOKEN</string>
<key>FacebookDisplayName</key>
<string>APP-NAME</string>
Lưu ý:
- Thay APP-ID bằng APP-ID của bạn vào. (như hình ở dòng 60 phải để lại chữ "fb" ở phía trước APP-ID)
- Thay CLIENT-TOKEN bằng của bạn: Vào Setting/Advanced sẽ thấy nhé (xem hình dưới)
- Thay APP-NAME bằng tên app của bạn.
- Tiếp theo, thêm đoạn code dưới đây vào ngay sau đoạn code vừa thêm:
<key>LSApplicationQueriesSchemes</key>
<array>
<string>fbapi</string>
<string>fbapi20130214</string>
<string>fbapi20130410</string>
<string>fbapi20130702</string>
<string>fbapi20131010</string>
<string>fbapi20131219</string>
<string>fbapi20140410</string>
<string>fbapi20140116</string>
<string>fbapi20150313</string>
<string>fbapi20150629</string>
<string>fbapi20160328</string>
<string>fbauth</string>
<string>fb-messenger-share-api</string>
<string>fbauth2</string>
<string>fbshareextension</string>
</array>
- Tiếp theo mở file AppDelegate.m
- Import dòng này vào:
#import <FBSDKCoreKit/FBSDKCoreKit.h> // <- Add This Import for FBSDK
- Tiếp theo, chèn dòng này vào trong didFinishLaunchingWithOptions:
[[FBSDKApplicationDelegate sharedInstance] application:application
didFinishLaunchingWithOptions:launchOptions];
- Tiếp theo, chèn function này vào vị trí cuối function trên:
- (BOOL)application:(UIApplication *)application
openURL:(NSURL *)url
options:(nonnull NSDictionary<UIApplicationOpenURLOptionsKey, id> *)options
{
[[FBSDKApplicationDelegate sharedInstance] application:application
openURL:url
options:options];
return YES;
}
3. Code React Native:
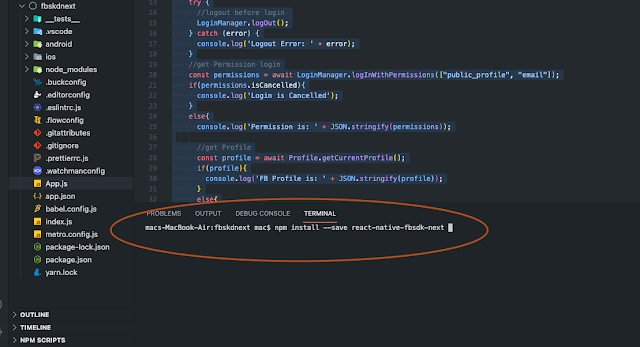
- Cài đặt react-native-fbsdk-next : Trong project, chạy npm để cài:
npm install --save react-native-fbsdk-next
- Tiếp tục chạy dòng lệnh: cd ios/ && pod install
- Xong nhớ chuyển về thư mục Project bằng lệnh: cd..
- OK. Giờ mở file App.js và paste code mình làm sẵn vào chạy thử:
import React, { useEffect } from 'react'import { SafeAreaView, StyleSheet, Text, TouchableOpacity, View } from 'react-native'import { Settings, LoginManager, Profile, AccessToken } from 'react-native-fbsdk-next';const App = () => {useEffect(() => {Settings.initializeSDK();}, []);//function on Login Pressconst onLoginFbPress = async () => {try {//logout before loginLoginManager.logOut();} catch (error) {console.log('Logout Error: ' + error);}//get Permission loginconst permissions = await LoginManager.logInWithPermissions(["public_profile", "email"]);if(permissions.isCancelled){console.log('Login is Cancelled');}else{console.log('Permission is: ' + JSON.stringify(permissions));//get Profileconst profile = await Profile.getCurrentProfile();if(profile){console.log('FB Profile is: ' + JSON.stringify(profile));}else{console.log('FB Profile is NULLLL');}//get Tokenconst token = await AccessToken.getCurrentAccessToken();if(token){console.log('token is: ' + JSON.stringify(token));}else{console.log('token is NULLLL');}}};return (<SafeAreaView><Textstyle = { styles.text }>Test FBSDK Next</Text><TouchableOpacityonPress = {() => onLoginFbPress()}style = { styles.btn }><Text style ={styles.text}>Login FB</Text></TouchableOpacity><TouchableOpacityonPress = {() => LoginManager.logOut()}style = { styles.btn }><Text style ={styles.text}>Logout FB</Text></TouchableOpacity></SafeAreaView>)}export default Appconst styles = StyleSheet.create({text: {backgroundColor: 'gold',fontSize: 25,alignSelf: 'center',margin: 10,},btn: {margin: 5,padding: 3,backgroundColor: 'blue',alignItems: 'center',},})
4. Thành quả:
- FB Profile chỉ có kết quả trả về khi trên máy không cài Facebook App. Còn nếu có cài đặt Facebook App thì FB Profile trả về là NULL.
4.1. iOs:


4.2. Android:
Lưu ý khi test android:
- Lần đầu Login phải sử dụng tài khoản Facebook chính (tài khoản mà dùng để tạo App trong Developer)
- Khi mở lần đầu, sẽ hiện ra màn hình thông báo lỗi Key Hash, lấy mã Key Hashes trong màn hình thông báo đó và thêm vào ô Key Hashes như trong mục 1.11. (vẫn để mã cũ và thêm vào mã này nữa)


Không có nhận xét nào:
Đăng nhận xét